Создание процедурно разрушаемой машины в UE4
Систему процедурно разрушаемой машины можно бесплатно скачать с Gumroad и импортировать в Unreal Engine 4.
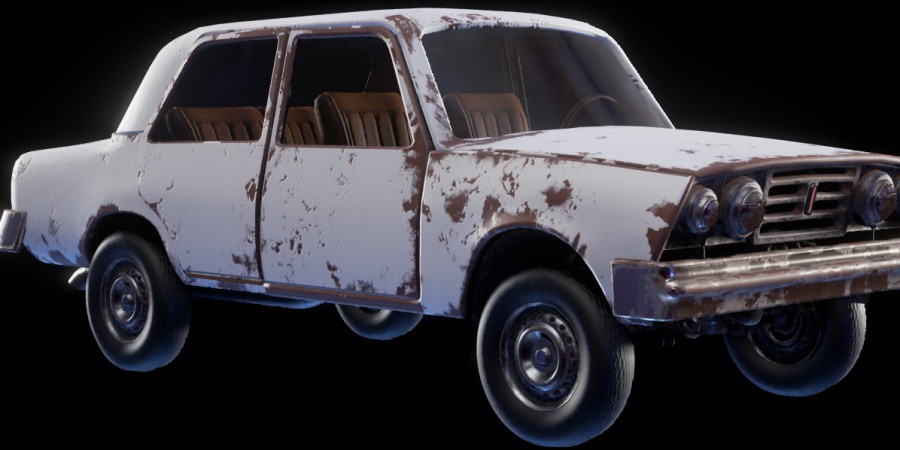
Dries Deryckere рассказал о том, как ему удалось создать замечательную процедурную систему разрушения машин. Трудно представить что студенты могут делать с новейшими технологиями в наши дни. Dries Deryckere совсем недавно опубликовал свой проект (который вы можете скачать абсолютно бесплатно или пожертвовать несколько долларов на Gumroad), который содержит в себе сцену разрушаемых автомобилей с мощными скриптами. Dries рассказал, как он решился сделать эту систему и какие проблемы встречались при создании проекта.
Вступление
Меня зовут Dries Deryckere. Я студент Digital Art and Entertainment (DAE). DAE располагается в Кортрейке, Бельгии. В настоящее время я нахожусь на стажировке в Валенсии. Я занимался фрилансом некоторое время, включая работу с ассетами здесь: beffio.com. Я никогда не работал над большими проектами, так как я ещё студент, который только знакомится с этим направлением.
Создание процедурно разрушаемой машины
Данный проект создавался для научной работы по окончанию учебного года в DAE. Я изучил различные пути процедурной деформации и наконец сел за создание этой системы. Система работает по такому принципу:
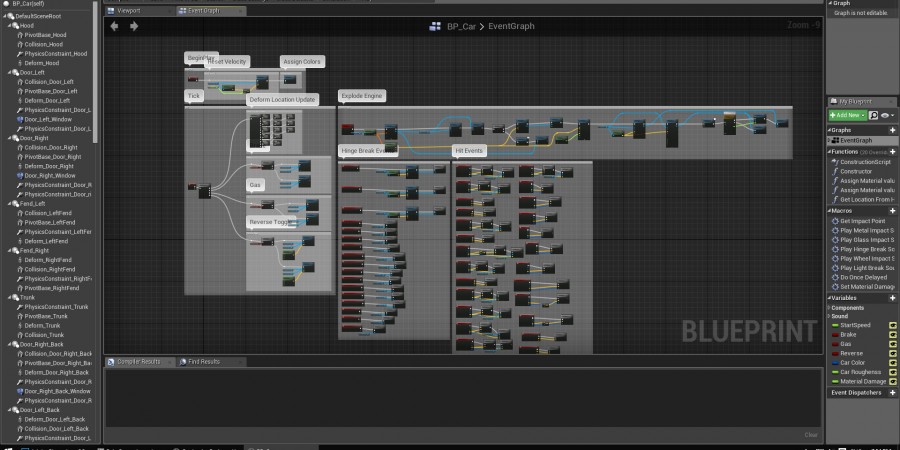
Unreal Engine 4 поддерживает систему skeletal меша, которая позволяет пользователю импортировать Fbx файлы с риггом. Этим объектам можно придать физику и симуляцию ragdoll. Я создал меш и добавил на него сильный damping. Модели не имеют анимаций, кроме естественного толкания объекта другим объектом с коллайдером.
Проблема заключалась в том, что объект не падал на пол и не имел другой физики, кроме деформации. Я придумал такой выход из ситуации, который позволил бы симулировать физику в local space. Я достиг этого результата благодаря созданию статичного меша, так чтобы объект вел себя как будто мы установили «simulate physics».
Потом, используя Blueprint, я поставил конструкцию skeletal меша поверх статичного меша. Оба меша имеют коллайдеры, которые взаимодействуют с другими физическими объектами, но коллайдеры не действуют друг на друга.
Если говорить кратко, то вот мой совет в двух словах: Skeletalmesh with high damping > teleport to > simulated staticmesh.
Проблемы первой версии моего проекта:
1. Машины не могут взаимодействовать друг с другом (скоро будет исправлено).
2. Деформация непредсказуема и объекты должны быть очень тяжелыми, чтобы было видно реальное воздействие.
3. Некоторые объекты отсутствуют на машине.
4. Требуется сильное железо для 6+ машин на сцене.
5. Систему приходится переделывать под каждую новую машину практически с нуля. Нет возможности нажать на кнопку «Generate» и сгенерировать под нужный пользователю меш.
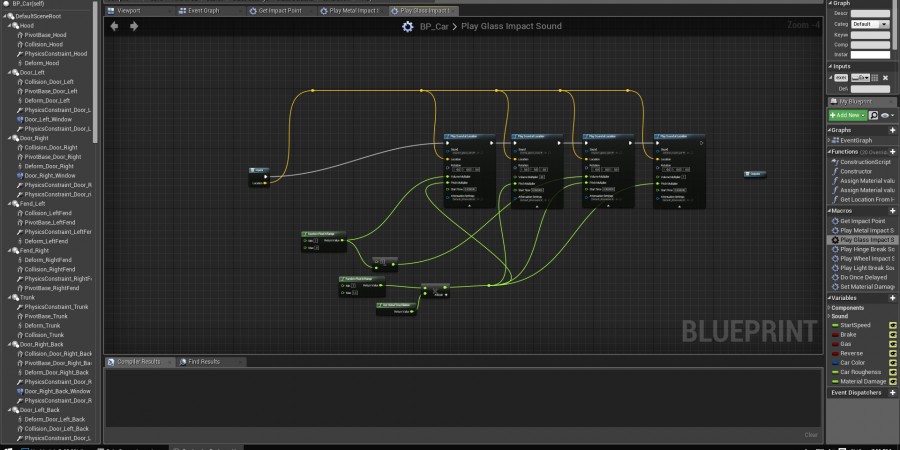
6. Все элементы проекта затекстурированы в Substance Painter. Эффект деформации в Normal карте создается благодаря динамическому материалу, который регистрирует попадание.
Скачать Procedural Destructible Car UE4
Скачать проект можно с сайта Gumroad, установив свою цену. Можно скачать абсолютно бесплатно и, если вам понравилась система Dries Deryckere, то вы можете пожертвовать деньги на развитие системы.
PsRealVehicle, или Open Source-плагин физики танков в Armored Warfare: Assault

Пару лет назад нашей команде выпала честь заняться созданием мобильной «Арматы». Придерживаясь правила «делаем игру, а не технологию», прототип мы создавали на том, что уже есть в движке. Это был UE 4.9, в основе физической модели — PhysX Vehicles, и много боли (как по поводу, так и без).
В дальнейшем наша команда создала open source-плагин PsRealVehicle, доступный по MIT лицензии. Этот плагин заточен под физику танков и колесных машинок для высоконагруженных сетевых шутеров, и его работу вы в любой момент можете наблюдать в нашем проекте Armored Warfare: Assault.
Имена, явки, пароли.
Четко. Ясно. И только по делу.

Немного истории, или Назад к истокам
Работу над проектом мы начали на Unreal Engine 4.9. В то время «из коробки» физика машин поддерживала только четырехколесные машинки, а для шестиколесных «лавок» (LAV-400, наша первая «боевая» машина-прототип) пришлось сразу же использовать кастомную сборку движка. Со встроенной физикой танков было ещё хуже: данные о том, как всё работает и настраивается, приходилось по крупицам выуживать из кода.
Следуя правилу «прототипируй», мы сформировали для себя следующие требования:
Итак, требования приблизительно понятны, приступили к делу. Достаточно быстро мы собрали первый прототип, танчики ездили, машинки колесили, но было у нас две беды:
Геймдизайнеры от такого были далеко не в восторге. Программисты плакали, кололись, но продолжали есть кактус (партия требует рабочего решения!). Прототип был одобрен руководством, и отправлен на создание альфа-версии (к слову, видео из прототипа есть на Youtube. Но время шло, а надежды на светлое будущее такой физики становились всё меньше. Настроек было недостаточно, их поведение выглядело чёрной магией. А позиция «игра, а не технологии» по-своему связывала руки. Хотя бы сомнениями в том, а потянем ли.
Тихонько вооружившись Википедией, остаточными школьными знаниями и опытом работы над физикой «на понтонах» а-ля Assassin’s Creed, за пару дней я создал прототип новой физики танка, который и лег в основу плагина PsRealVehicle. В течение недели proof-of-concept был поставлен на ноги, показан CTO команды и защищён нагрузочным тестированием. Цифры говорили: своей физике — быть.
Путь от прототипа до прода вышел куда длиннее. Если на концептуальную проверку хватило недели, то на адекватную бета-версию ушло уже месяца полтора. Создание полноценного «продовского» релиза заняло около полугода, постоянная доводка и коррекция — на протяжении всего времени работы над проектом. Во многом такой высокой скоростью разработки и внедрения физики в проект мы обязаны пришедшему как раз в то время в нашу команду техническому геймдизайнеру Игорю, чья дотошность в аспектах работы математической модели и ее субъективного восприятия игроками и привела к текущему результату. Должен признать, в технологическом смысле я — варвар: мое дело сделать топор, чтобы валить лес. После обработки Игорем и доводки модели другими ребятами мы получили production-ready открытое решение, масштабируемое и в высшей мере оптимизированное для нужд мультиплеера. Здесь есть чем гордиться: из множества доступных на рынке плагинов (включая встроенный PhysX Vehicles) наш самый быстрый и прозрачный в настройке.
Кстати, не обошлось и без смешных случаев. Пока мы работали с PhysX Vehicle и наши предельно скользкие многоколесные машинки не могли взобраться на мелкие холмы, я не раз слышал упреки, мол, не может наша команда настроить, чтобы как у людей было. Решение об использовании своего плагина было принято, в том числе, под влиянием этого кадра:
Новейшая разработка советской армии! Танк-паук, который способен подниматься на 89-градусные стены. Такое крыть было просто нечем 😀
Особенности нашего решения
Прежде чем я перейду к описанию настройки танков и машин в PsRealVehicle на примере нашего AW: Assault, хочу сказать еще о паре вещей, которые легли в основу используемой физической модели.
Во-первых, мы четко придерживаемся того, что мы делаем не симулятор физики танка, а игру, в достаточной мере аркадную. Как ни печально, но мало кому нужен настоящий в своем поведении танк — это круто только на презентационных видео-роликах, а не в управлении, и уж тем более шутере. Игроку нужен такой танк, который ведет себя как танк в том понимании, которое уже создали другие блокбастеры. И чтобы работало на обычном девайсе, а не Titan’е каком-нибудь.
Первый пункт имеет следствие: некоторые вещи в игре работают весьма фейково. Если что-то выглядит как танк и ведет себя как танк — то это танк, и не важно, что внутри он немного фрегат, или что часть физики настроена условной магией трения. Одним из таких условностей является регулирование поворота машинки путем изменения угловой скорости, а не силами, приложенными к колесам и подвеске. Условно, танк поворачивает на X градусов в секунду, потому что мы так решили исходя из геймплейных соображений, а не потому, что у него гусеницы вращаются с такой-то скоростью.
Кстати, это не отменяет того факта, что «под капотом» можно включить «настоящую» физику поворота, именно она использовалась в первых прототипах. По-хорошему, к ней стоит прикрутить работу угловой подвески, подлом колеса и так далее. Если мы начнем делать гоночные симуляторы, обязательно к этому вернемся, а пока это один из пунктов в списке вероятных доработок.
Структура танка в AW: Assault
Иерархия классов
Каждая машина представляет из себя набор таких данных:
Анимация танка
Настроить один танк — мелочь, каким бы сложным ни было анимационное дерево. Настроить десятки таких танков и поддерживать их в актуальном состоянии, при изменении костей, меша и так далее — совершенно неадекватный объем для ручной работы. К счастью, в нашем случае речь идёт о достаточно стандартизированном «персонаже»: танк можно препарировать на сущности и называть их шаблонно. Речь, конечно же, об именовании костей.
Такой подход позволил использовать по сути одно и то же анимационное дерево, которое святыми Ctrl+C / Ctrl+V множится на любое число танков и не требует никакой поддержки, кроме изначального QA-check’а.
Вся магия происходит внутри кастомных сипипи-нод. Это позволило не только стандартизировать дерево, но и сильно сократить количество вычислений на расчёте анимаций (стандартные ноды очень любят гонять системы координат туда-сюда).
Материалы танка
Для всех частей танка используется один мастер-материал, кастомизируемый парой Switch-нод.
Далее мы получаем такое дерево:
Настоящий «вес» здесь имеют только M_Vehicles и MI_Vehicles_Clean_Treads, все остальные инстансы — просто наборы параметров и потребляют минимум памяти и места на диске.
В целом, набор графических ассетов для танка получается весьма стандартным для любых игр.
Работа брони
Несколько раз при общении с коллегами возникал вопрос, почему каждый кусок брони у нас сделан отдельным мешем, и почему мы не используем анриловскую систему коллизий?
На самом деле мы используем обычные анриловские коллизии, но только чтобы «поймать» пулю. После того, как прожектайл воткнулся в танк, обсчёт повреждений происходит пополигонально по всем листам брони, с учётом свойств каждого куска, многослойности, переотражений снаряда, кумулятивной воронки и прочих интересных механик.
Самое удобное для такого случая — читать «голые» данные меша, которые для выделенного сервера мы не strip’аем.
Сеть и экстра-оптимизация
Пара «околотанковых» моментов, которые я также хотел бы кратко упомянуть.
Всё движение танков осуществляется только на сервере, клиенты лишь интерполируют полученные значения. Никакой экстраполяции не используется. Частота синхронизации — 10 раз в секунду.
В зависимости от ScreenSize танка мы пропускаем то или иное количество тиков скелетал меша, что включает в себя обсчёт всех анимаций и некоторых физических взаимодействий. Если танк не виден на экране — он тупой не анимированный ящик, плавающий в пространстве. Встроенный Update Rate Optimization, несмотря на хорошую идею, обладает весьма грубой реализацией, не дающей ощутимого прироста производительности. Особенно, если речь о мобилках.
Для всех танков, кроме собственного, на клиенте отрезаются все компоненты, кроме самых базовых: камер, чекеров и прочего, из чего состоит танк. По сути, они не имеют ничего, кроме внешнего вида.

Me, Myself & Tanks
Мы в Pushkin Studio считаем, что обмен опытом разработки очень важен, в том числе и для роста профессионального уровня внутри команды. Open Source-проекты — значимая составляющая такого подхода, и я рад, что могу представить сообществу такую технологию, как PsRealVehicle.
На мой взгляд, очень важно, что мы сами ежедневно используем все публикуемые нами плагины и утилиты. Ведь путь, ярко демонстрируемый самими Epic Games, заключается в том, что успех хорошей технологии — это использование её самими разработчиками в собственных продуктах. Сейчас мы работаем уже на версии UE 4.20, наш плагин прошел с нами весь этот путь, и мы не собираемся останавливаться!
Vehicle User Guide
The Unreal Engine 4 Blueprint Vehicle User Guide.
At the end of this guide, you’ll have a fully functional vehicle that you can use in your own game projects.
In this guide, we’ll cover the creation of a vehicle using the Wheeled Vehicle Blueprint class in a new blank project. This guide will take you through the process of creating all the necessary in-editor items you need to have a functional vehicle but assumes you have your own Skeletal Mesh and a Physics Asset ready to go. At the end of this guide, you should have a fully functional vehicle similar to the one from the Vehicle Game or the Vehicle Template.
Objective
During the course of this tutorial you will create the key components that make up a Vehicle in Unreal Engine 4 (UE4). Some of this requires assets that you create outside of UE4, while the majority of the components will be created right inside of the Editor!
This is the individual assets that make up the Vehicle we’ll construct:
An Animation Blueprint
A Vehicle Blueprint
One or more Wheel Blueprints.
A TireConfig Data Asset

By the end of this guide you’ll know how to setup each of these asset types and how they work together to bring your vehicles to life!
How to configure a TireConfig Data Asset
How to configure a Wheel Blueprint for your Font and Rear wheels.
How to setup an Animation Blueprint specifically for a Vehicle.
How to configure your Vehicle Blueprint with your Skeletal Mesh, Animation Blueprint, and Wheel Blueprint(s).
How to configure your Axis Mappings and Bindings to control your Vehicle.
How to create and assign a new Game Mode to spawn your vehicle.
Open Unreal Engine from the Launcher. The Project Browser will appear.
Create a new Project from the Games category, with C++ and With Starter Content enabled. We’ll need to enter a project name, so we’ll use «QuickStart». We can now click Create Project and get started.
The Unreal Editor will now open our new project. Visual Studio will also open and load the solution file that our project has created.
![]()
In this first step to creating our own vehicle, we have two parts that go together to make up the wheels for the vehicle; the TireConfig Data Asset and the Wheel Blueprint class. We’ll start by first creating the TireConfig Data Asset and then move on to create the Wheel Blueprint that houses properties for our wheels, including where the TireConfig data is assigned to.
Follow along with the steps below to get started creating your TireConfig data and then using that with a Wheel Blueprint.
Tire Config Data Asset
The TireConfig Data Asset is used to control Friction Scale. This value not only affects the raw friction of the wheel but also scales the values for how difficult (or easy) it is for the wheel to slide while in a hard turn. There is also the additional option of Tire Friction Scales, which enables you to specify a specific Friction Scale to different Physical Material types.

Create your TireConfig Data Asset
In the Content Browser, click the Add New Button, then hover over Miscellaneous and then select Data Asset from the Context Menu.
In the Pick Data Asset Class window, select TireConfg to create this type of Data Asset.
The new asset will be created in your Content Browser. Make sure to give it a recognizable name so you can easily locate it later.
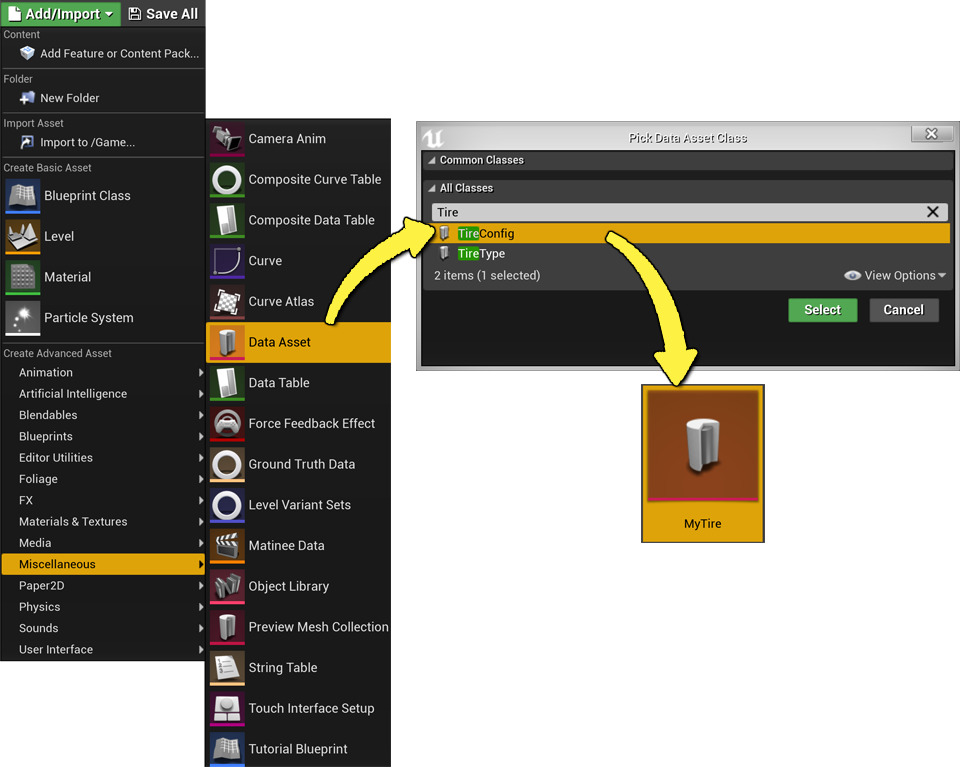
In the Pick Data Asset Class window, you may notice that there is also a TireType Data Asset class. This is a deprecated function and is only used when upgrading older projects to a recent version of Unreal Engine. You should not have any reason to use this data asset type if using a recent version of Unreal Engine, 4.15 or higher.
Wheel Blueprints
In most cases, you will have at least two wheel types; a wheel that is affected by steering and one that is not. Also, this may be the case for having differently sized wheels for the front or the back, in which case, you have full control over setting the differing radii, mass, width, handbrake effect, suspension, and many other properties to give your vehicle the handling you desire.

Click the image for full size view.
Create your Wheel Blueprint
In the Content Browser, click the Add New button, then select Blueprint Class from the menu.
In the Pick Parent Class window, under All Classes, search for «wheel» and then select VehicleWheel.
The new asset will be created in your Content Browser. Make sure to give it a recognizable name so that you can easily locate it later.

Editing the Wheel Blueprint
Now that you’ve got your Wheel Blueprint(s), open them in the Blueprint Editor, where you’ll see all the available options to edit your wheels!
There are five properties that we need to initially change for each wheel, as the rest of them will change how the vehicle performs (and should be tweaked later) as you start to test out the vehicle in your own game.
Shape Radius
Shape Width
Affected by Handbrake (usually restricted to the rear wheels)
Steer Angle (usually only the front wheels)

The properties here are set to match the Buggy from Vehicle Game. If you’re using your own Skeletal Mesh, you may need to use different values for the Shape Radius and Shape Width.
Now, under the Tire section, you can assign the Tire Config Data Asset that you initially created using the Tire Config selection box.

End Result
At this point, you’ve created the TireConfig Data Asset and your Wheel Blueprint(s), which you’ll use later with the Vehicle Blueprint. In this step, you’ll continue to ready your content by creating an Animation Blueprint that drives all of your animation needs for the wheels on the vehicle.
Animation Blueprints
The Animation Blueprint will be used to control the animation of our Vehicle Skeletal Mesh so that it has animations specific to a vehicle, like spinning tires, suspension, handbrakes, and steering. To offload a lot of the work in creating animations for these types of things, you can use the Wheel Handler node to drive these types of animations.
Wheel Handler Node
Where the Animation Blueprint is used to get and control animations for the vehicle, more specifically, the Wheel Handler node makes controlling all of the animations for the vehicle fairly easy with little to no additional setup. It simply grabs the necessary information from the wheels (How fast is it spinning? Is it affected by the Handbrake? What are the suspension settings for this wheel?) and translates the query results to an animation on the bone that the wheel is associated with.

Creating the Animation Blueprint
In the Content Browser, click the Add New button, then hover over Animation, selecting Animation Blueprint from the menu list.
In the Create Animation Blueprint window, locate and select your Skeleton from your vehicle’s list. Then click OK.
Alternatively, you can create an Animation Blueprint directly from your Skeletal Mesh by selecting it in the Content Browser, where you’ll be able to select Create > Anim Blueprint.

Now that you’ve got an Animation Blueprint to work from, you can open it from the Content Browser by selecting and double-clicking it. From the main toolbar select Class Settings and then in the Details panel set the Parent Class to VehicleAnimInstance.

If this is not properly set to the right Parent Class, you will not have access to nodes needed later in this guide.
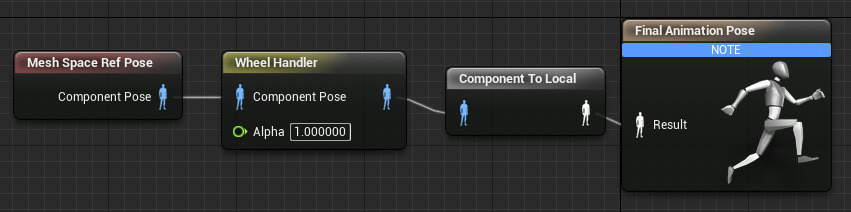
In the Anim Graph, you’ll want to start by right-clicking to bring up the context menu and then searching for the Mesh Space Ref Pose node. Select it from the list to create it in place.

Next, right-click in the Anim Graph to bring up the context menu and then search for the Wheel Handler, selecting it from the list to create it.

Now, connect the nodes so that your Anim Graph looks like this one.
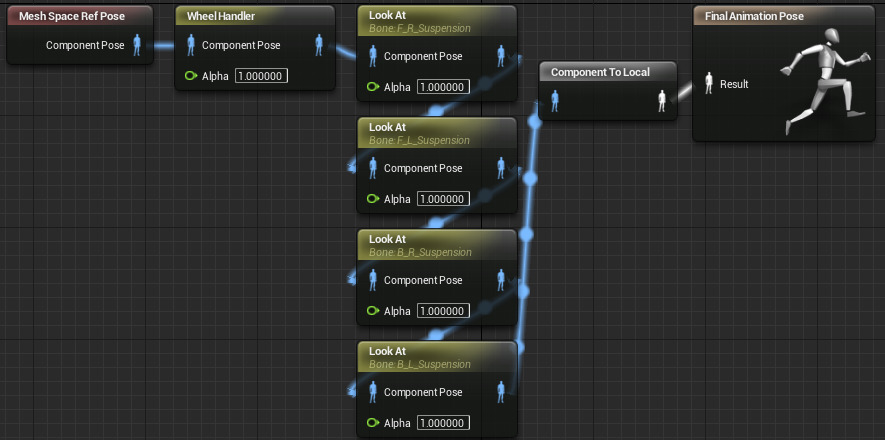
Optionally, if you have additional struts or other suspension needs (like the Buggy from Vehicle Game) you will need additional nodes in your Animation Graph to handle the joints that affect those polygons. In the Buggy, from Vehicle Game, the extra joints are used to control the axle connections to the wheels. These are driven by a simple Look At node, which, when given the wheel joints, will be driven by the Wheel Handler node and the Look At nodes will make sure the suspension stays attached to the wheels.
End Result
You’ve finished setting up the Animation Blueprint! The Component to Local conversion node will be created automatically and the Animation Blueprint will now drive the wheels of the vehicle. Continue on to the next step to learn how to create a Vehicle Blueprint that brings all of the previous steps together.
By now, you’ve created a few different assets (TireConfig Data Assets, Wheel Blueprints, and an Animation Blueprint), which you need to bring together to create a fully functional vehicle in Unreal Engine 4 (UE4). In this step, you’ll create the Vehicle Blueprint, using those assets that were previously created and set up.
Creating and Editing the Vehicle Blueprint
In the Content Browser, click the Add New button, then select Blueprint Class from the menu.
In the Pick Parent Class window, under All Classes, search for «wheel» and then select WheeledVehicle.
In your Content Browser, the new Blueprint asset will be created. Make sure to give it a recognizable name so that you can easily locate it later.

From the Content Browser, select and open your newly created Vehicle Blueprint.
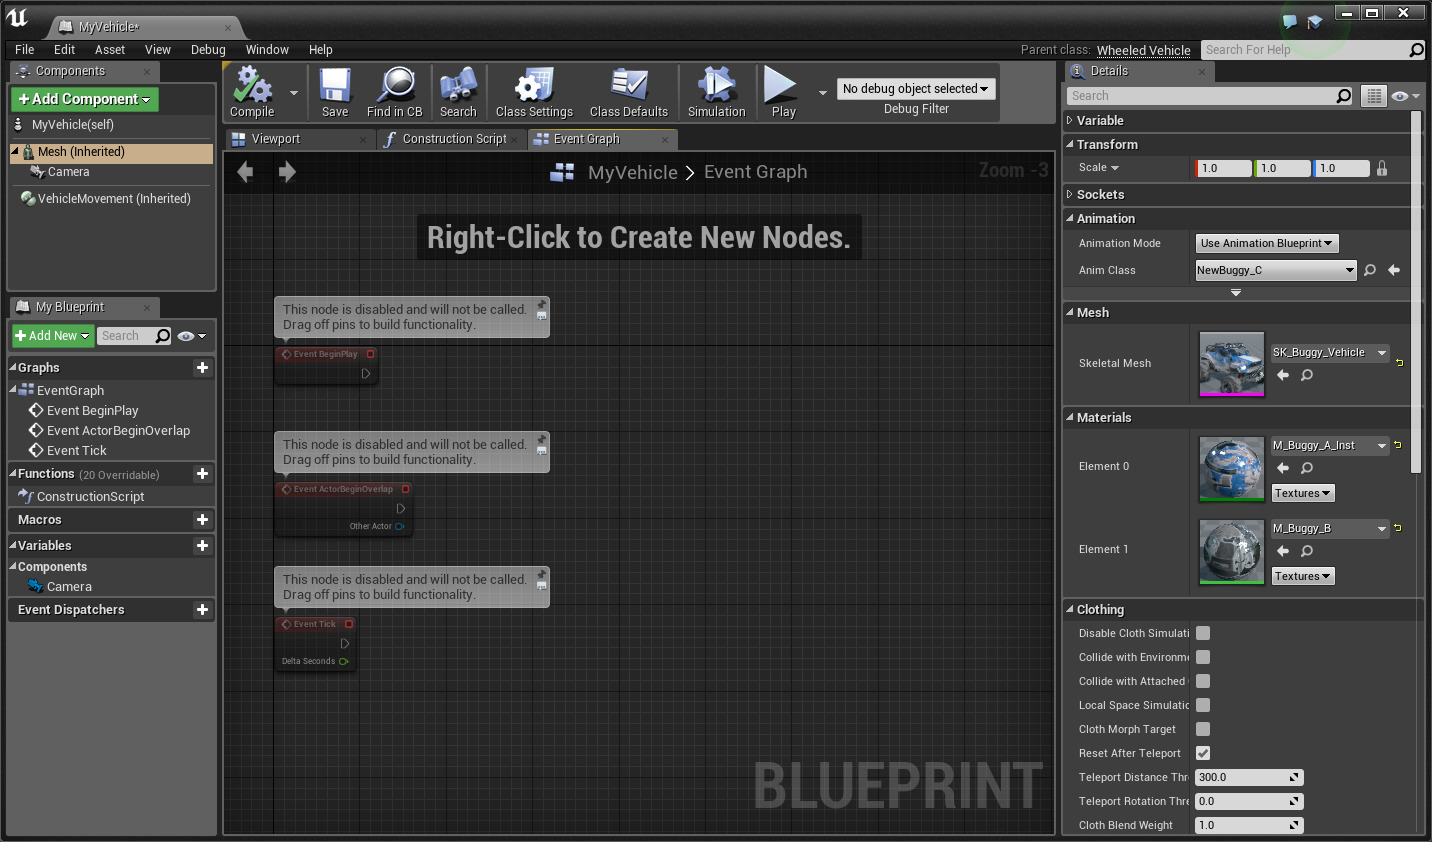
Click on the Skeletal Mesh Component named Mesh from the Components Window. Then, in its Details panel, set the Skeletal Mesh selection box to your vehicle’s own Skeletal Mesh asset.

Set the Anim Blueprint Generated Class to your vehicle’s Animation Blueprint that we created in Step 2 of this guide.

Go back to the Components window and select the Add Component button and select a Camera Component.

Use the Viewport in the Blueprint Editor to position the Camera where you would like it to be relative to your vehicle. In the image below, it is positioned behind, slightly raised, and tilted down towards the vehicle.

With the Camera component still selected (in the Details panel under Camera Settings), disable the option for Use Pawn Control Rotation. This will lock the camera to its view direction (rather than that of the Player Controller).

Next, select the Vehicle Movement Component in the Components window.

In the Details panel under the Vehicle Setup section, expand the arrow next to Wheel Setups and for each wheel (0-3) set the following:
Set the Wheel Class to the Wheel Blueprint(s) you created.
Set the Bone Name to the name of the joint that should be controlled by the wheel.

The Bone Name in the above image is specific to this skeletal mesh. If you’re using the Vehicle from Vehicle Game, you can use these Bone Names.
The order you assign wheels has no bearing on if it is a front or a rear wheel, only the Bone Name and Wheel Class have any effect. For organizational purposes, it’s best to keep the wheels (front and rear) together.
If you need more than 4 wheels, you can click the «+» icon next to the Wheel Setups property to add more.
End Result
At this point, assuming your vehicle is not substantially larger than a minivan, the default values will be a good starting point for you to move on to the next step in this guide, where you’ll setup the inputs and controls to properly test the vehicle.
By now, you’ve done everything you need to do to have a fully functional vehicle by creating the Wheel, Animation, and Vehicle Blueprints in Unreal Engine 4, except to be able to control it in your game! In this step, we’ll show you how to set up the necessary axis mappings and bindings so that you can drive the vehicle around and fully test its capabilities.
Because there are a few ways to go about setting up the vehicle for testing, and assuming that you started with a blank project template, all of the inputs will need to be added to control the vehicle. If you started with an existing template, some (or all) of these axis mappings and bindings may already be available for you in your project.
Setting Up The Controls
Go to the Main Menu and select Edit > Project Settings to open the Project Settings window. Then, under the Engine section in the side panel, select Input.

In the Bindings menu, set up the following controls (if you do not currently have them listed). If you do have them listed, it would be wise to double-check that they are set up like the ones listed here, so that you know your vehicle will work correctly.
First, we’ll setup an Action Mappings by clicking the + sign next to the Action Mappings property.

Rename the Action Mapping from «NewActionMapping_0» to Handbrake. Then, expand this property to use the selection box to change the key value from «None» to Space Bar.

Next, we’ll setup the Axis Mappings by clicking the + sign next to the Axis Mappings property. Repeat this so that you have two Axis Mappings, like this:

Rename the first Axis Mapping from «NewAxisMapping_0» to Forward. Then do the same for the second and rename it from «NewAxisMapping_1» to Right.

Expand the Forward Axis Mapping and then click the + sign once so that you have two Axis Mappings listed under «Forward». Then set the first «None» to use the W key for input. Set the second «None» to use the S key.

Next to the S key input under the Forward Axis Mapping, change the Scale value to be -1.

Expand the Right Axis Mapping and then click the + sign once so that you have two Axis Mappings listed under «Right». Then set the first «None» to use the D key for input. Set the second «None» to use the A key.

Next to the A key input under the Right Axis Mapping, change the Scale value to be -1.

Once you’re done setting the Action and Axis Mappings, your Bindings should look like this:

Now that you’ve got the controls set up, you’ll need to actually do something with them. So, open up the Vehicle Blueprint that you created and locate the Event Graph, where you’ll be able to call these Axis and Action events that you created in the Project Settings Input section.
In the Event Graph, for the throttle setup create the following:

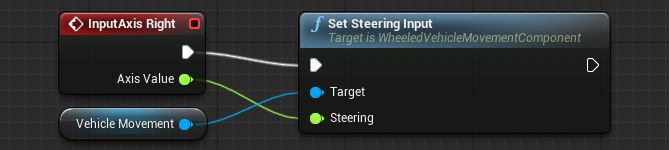
In the Event Graph, for steering setup the following:
In the Event Graph, for the handbrake setup the following:

End Result
Now with these Input Events added you have a fully functional vehicle that can take input movement! In the next and final step, you’ll set up a new Game Mode that uses your Vehicle pawn as the default pawn when you launch a game.
In the previous step, you finished setting up our Vehicle Blueprint and assigned all of the controls that you need to make it work properly. In this last step, you’ll finish by setting up a new Game Mode that uses your own Vehicle Blueprint as the Default Pawn for the game.
If you did not use a Blank Project Template when starting this guide you may find that you already have a Game Mode assigned that conflicts with the one you’ll create in this step. Use the steps below to create a new Game Mode so that you can spawn in the vehicle you’ve created throughout this guide.
Creating a New Game Mode
In the Content Browser, click the Add New button and select Blueprint Class from the menu list.
In the Pick Parent Class window, select Game Mode Base, and then click the Select button to create the Game Mode Blueprint.

In the Content Browser, double-click to open the new Game Mode Blueprint so that you can edit it. In the Details under Classes, next to Default Pawn Class, use the drop-down selection to choose Your Vehicle Blueprint (which you created in Step 3).

Aftering doing this, you can click Save and then Close this window.
In the Main Viewport window, in the World Settings tab under the Game Mode section, set GameMode Override to Your Game Mode Blueprint.

End Result

Congratulations! Now, when you Play in Editor (PIE) you should automatically spawn in with your very own vehicle that you created. You’ve learned everything you need to create your own working vehicles in UE4. As you worked your way through this guide, you learned:
вњ“ How to configure a TireConfig Data Asset.
вњ“ How to configure a Wheel Blueprint for your Font and Rear wheels.
вњ“ How to setup an Animation Blueprint specifically for a Vehicle.
вњ“ How to configure your Vehicle Blueprint with your Skeletal Mesh, Animation Blueprint, and Wheel Blueprint(s).
вњ“ How to configure your Axis Mappings and Bindings to control your Vehicle.
вњ“ How to create and assign a new Game Mode to spawn your vehicle.
Doing More with Vehicles in Unreal Engine
For additional resources with Vehicles you can take a look at the following pages: